Reclining Hand-to-Big-Toe · Supta Padangusthasana
Supta Padangusthasana · 숩타 파당구쉬타사나 · 누운 다리 들기
Primary Series · Yoga Chikitsa (Yoga Therapy) — Seated Sequence
Breath: 5×4 · Drishti (gaze): toes · side
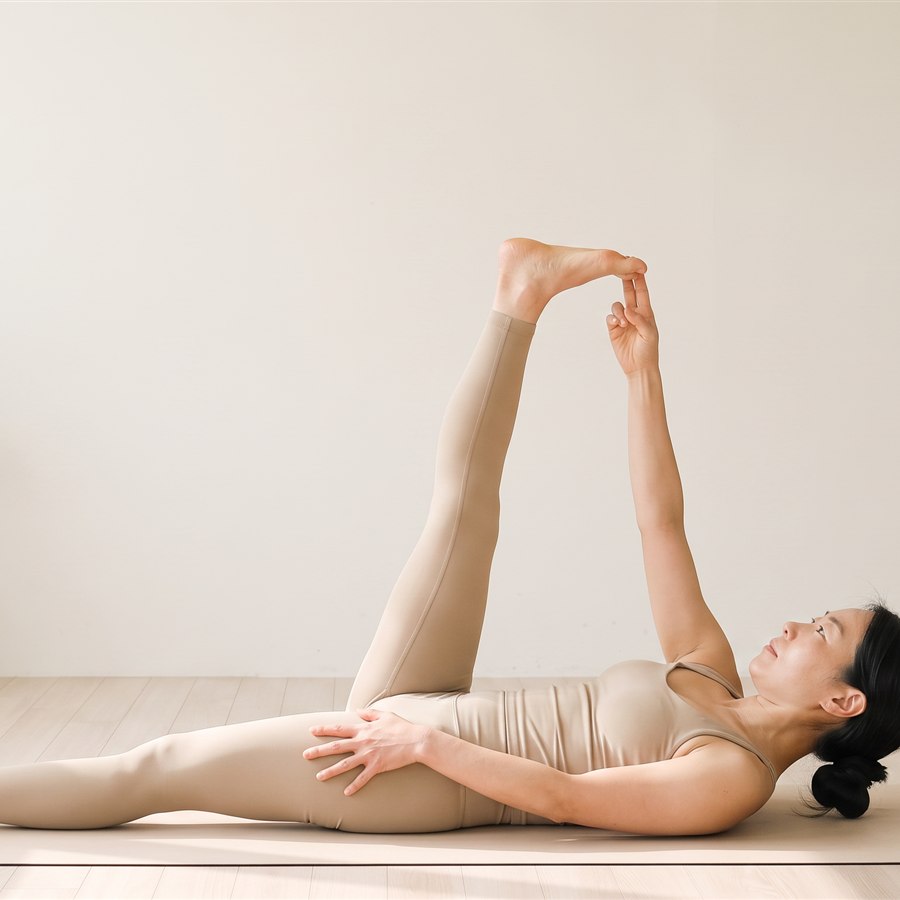
Lying down, raise one leg vertical to catch the toe, draw the chin toward the shin, then open the leg sideways and return. The floor leg drives down to pin the pelvis so only the moving leg travels — a deep hamstring stretch with the back fully supported.
Alignment
- Hands — two fingers hook the lifted big toe; the free palm pins the grounded thigh
- Feet — the floor leg's foot flexed; the lifted foot draws toward the face
- Knees — both straight throughout, even as the chin reaches the shin
- Gaze — the lifted toes (to the far side when the leg opens out)
Entering the pose
- Lie down, catch the right big toe
- Ground the left leg strongly
- Open the leg sideways, opposite hip stays down
Common mistakes
- The floor leg bending or lifting
- The whole body rolling after the leg
Modifications & props
- A strap around the sole lets the leg straighten while the shoulders stay grounded — this pose's standard prop.
- When the opposite hip rises as the leg opens sideways, rest a hand on that hip and let its weight anchor.
- Chin-to-shin is not the goal; draw the leg only as far as both shoulders remain on the floor.
Benefits
- A hamstring stretch with the back safely on the floor
- Teaches moving the leg independent of the pelvis
- Flexibility without loading the lower back
Role in the sequence
A mirror of Utthita Hasta Padangusthasana from early standing, laid on the floor. The same actions — leg forward, leg to the side — repeat over the ground's full support, so the attention balance once consumed goes wholly to the hamstrings and to separating leg from pelvis. As the seated sequence winds down toward the floor, it is also revision: what was learned standing, verified lying down.
Practice notes
The standing hand-to-big-toe pose has come back lying down. The only difference in the name is supta, reclining, and the work is the same — except that with balance no longer required, the hamstrings get your full attention. Things you could not notice while wobbling on one leg become obvious here.
The four stages are five breaths forward, five breaths with the leg opened to the side, back to centre, and five breaths bringing the nose toward the shin. As the torso lifts in that last stage the other leg tends to peel off the floor, and keeping it pressed down is half the pose. What the grounded leg does matters more than what the lifted leg does.
When the leg opens sideways, the task is keeping the opposite hip from rolling up with it. Let the pelvis follow and the leg drops much further, but what lengthens is the lower back rather than the hamstring. Two checks: is the heel of the floor leg still pressing down, and are you lifting the pelvis in the effort to straighten the raised knee? Bending that knee slightly to protect the pelvis is always the better trade.
A strap around the foot keeps the leg straight.
Written by Choi Seongjin — 20 years of Ashtanga practice, currently teaching three classes a week. Last updated: .
This guide is for general information and is not medical advice. If you are pregnant, injured, or have a medical condition, consult a qualified teacher or physician before practising. Disclaimer & Legal Notice
Other poses in this sequence
Ashtanga Shala — Ashtanga Vinyasa Yoga guide · Blog
Policies